• Blog - Photography

    T Tuesday: Chinese garden edition

    Last Friday Mini-me had the day off of work…yes, my little baby girl has a job. How does this happen?!?  The forecast had nothing good to say. Hot and humid with extreme heat warnings. So we figured the best course of action would be to go walking at the MN Landscape Arboretum. Yeah…good choices did not prevail. But that’s ok…all’s well that ends well as the old saying goes.

    We headed out early for a little fuel in the form of Chick-Fil-A biscuits and iced coffee.

    The Arboretum recently opened a new Chinese garden that we had completely forgotten about until we happened upon it on our 3 mile walk…technically its a drive but biking and walking are welcome.

    As you enter you pass under a lovely arch…this is it from the back of the garden.

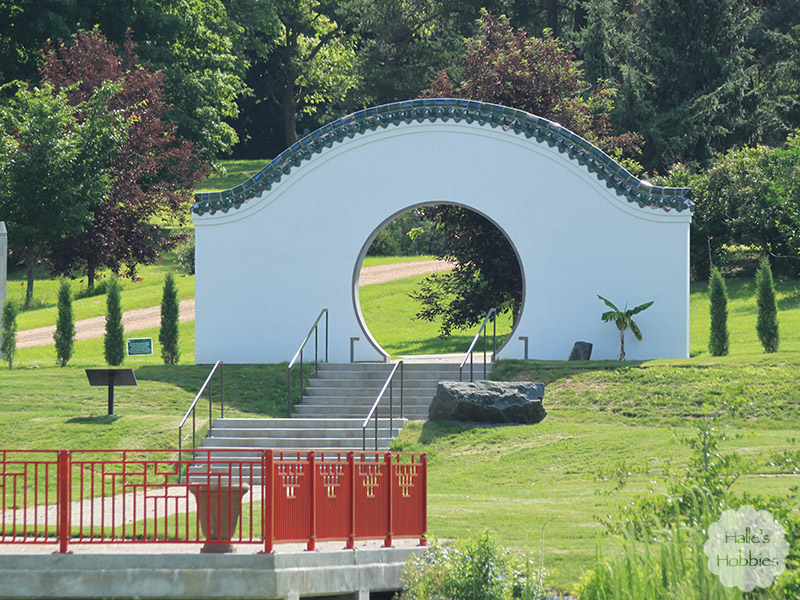
    This plaque greeted us as we passed through the archway.

    In the distance we could see large interesting art pieces drawing us further into the garden.

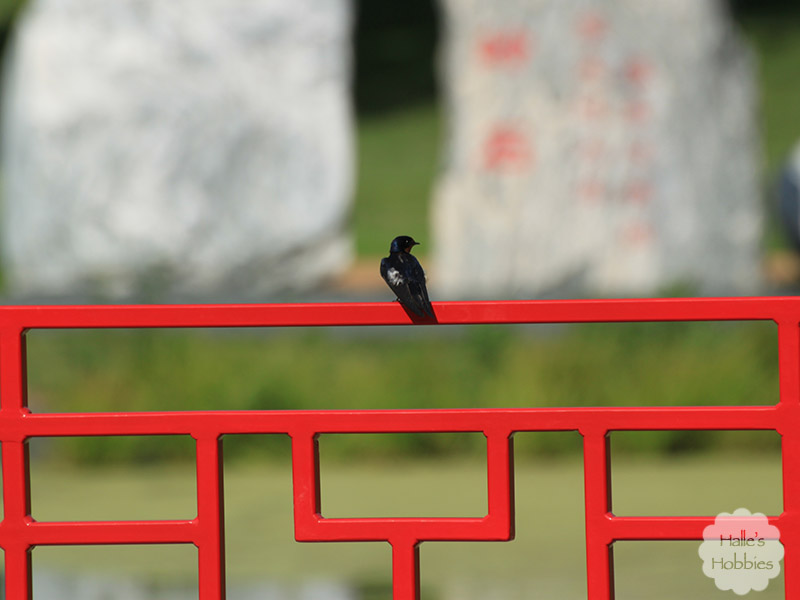
    As well as the geometric red fencing that was the perfect perch for several birds as they sang their beautiful songs over the pond.

    The area is quite sparse at this point. That may be purposeful. All I know is that by this point in our trek we were very overheated.

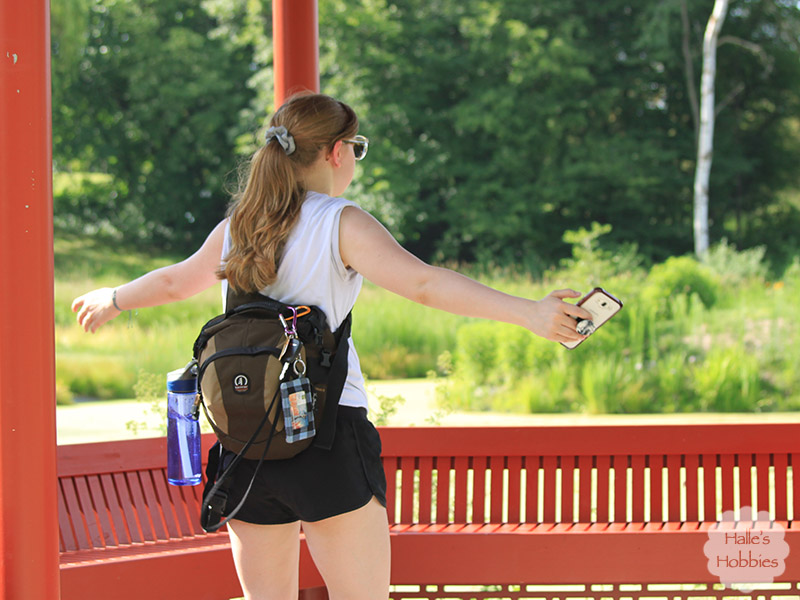
    Mini-me caught a bit of breeze in the shade of a pagoda.

     Ahead of us on the crushed gravel pathway was this gorgeous dragon.

    He looks very fierce. The detail of the work that the artist was able to create on the large scale using metal intrigues me. Evidently he is just on loan to the Arboretum. I wonder when and if they will have more permanent installations in that garden.

    We will definitely be making more visits to the Arboretum as summer continues. We like to walk, take photos and chat together. Its nice having grown up conversations with my kids. Ones that don’t involve nagging about chores, homework or how much time they spend staring at screens. (as I sit here staring at my screen)

    Today has a list as usual for me. It keeps me on track. In fact a friend and I are texting a photo of our list each morning to each other and then again in the evening to hold us accountable for checking stuff off that list. So far, so good. Of course this week with the Independence Day holiday things are a little wonky but stuff still needs to get done.


    What are you doing today?
  • Blog - Creativity - Tutorials

    A second look : ATC book tutorial

    Today’s second look is one of the very first tutorials I had ever written. I had Mini-me, who was 6 at the time, take photos of me during the creation process. She did a really nice job! She still has an eye for photography.

    Take a look….

    FYI….this was published on Blogger March 2009. My formatting was definitely different way back then.

    As requested by a few members of ABC I’ve taken pictures along the process of making my latest ATC book. I’ll do my best to explain the steps. Please click on the pictures for a better view of any step.

    These are the supplies you’ll need as well as some string or fiber and a large eye needle for the binding process as you’ll see later.

    After being properly scolded by Elizabeth, here is the supply list:

    • book large enough to fit your ATC’s
    • x-acto knife or other cutting blade
    • gesso
    • pencil
    • ruler
    • cardstock
    • cutting system such as guillotine or fiskars rotary cutter
    • white glue or gel medium
    • paint
    • paint brush
    • tissue paper or dress pattern(optional)
    • rubber stamps(optional)
    • ink pads(optional)
    • Japanese screw punch or awl
    • thread or fibers for binding
    • large needle
    • decorative beads(optional)
    • something to protect your work surface
    The first step is to remove the text block from the cover. To do this you carefully cut along the spine on each side of the text block being careful not to cut through the cover. I used a glued in binding book so I had to use a bit of muscle to separate the glued in block after cutting. I reinforced the spine with a strip of cereal box cardboard adhered with gel medium although I’m sure white glue would work as well.
    Next I coated both sides of the cover with gesso and set aside to dry.

    In the meantime I measured the text block to determine the size of the cardstock that I’d be cutting.

    For my book, I cut 16 pieces to 3.75″ x 10″. This will eventually yield 4 signatures but now I’m getting ahead of myself.

    My next step is purely personal preference. I randomly stamped both side of my pages for visual interest.

    After folding in half, I used a bone folder (forgot that in the supply photo as well) to make a nice sharp fold.

    Completed pages ready to be gathered into signatures.

    I used 4 pages for each of the 4 signatures…boy, that was a lot of fours!

    At this point the gesso on the cover had dried and I was ready to make them pretty. I love using dress patterns for texture. As an added bonus it acts as a reinforcement. I simple spread out white glue and pat the pattern tissue gently down then set aside to dry.

    After it dried, I painted the inside.

    Used the same technique on the outside with scraps of pattern tissue.

    And again painted and set aside to dry.

    While the cover was drying, I prepped the signatures for binding. I made a template from scrap cardstock as my guide for hole punching.

    I used a Japanese screw punch for my holes. You could also use an awl. You just don’t want the holes too big. I’m using the smallest bit my screw punch came with. BTW-the hole gets plugged when cutting through multiple layers. I keep a needle near by to dig out the tiny little circles plugging the punch.
    I used my guide to make the holes in the book binding as well.

    And punched 4 sets of 3 holes in the binding.
    I started with an 18 in fiber on a large needle in the center hole from the inside of the signature leaving yourself a 4 inch tail.

    Go through the outside of the book cover, slip in a bead then go back through the top hole in the cover and signature.
    Next go back through the center hole to the outside, slip on a bead and then go back through the remaining hole of the set.
    It should then look like this. Take the needle and go under the complete flat loop then tie the loose ends tightly in a knot. You’ve just completed your first signature. Go back and do it 3 more times.

    The way I do the pamphlet stitch binding isn’t exactly that way the tutorials out there would have you do it but it’s the way I do. I’d encourage you to do a search and check out the other techniques if mine seems unclear. There are video tutorials out there as well.

    Completed book outside..in poor light.

    Completed book inside.

    A few end notes…

    • I made sure my book was large enough to accommodate ATC’s in portrait and landscape orientation.
    • Be sure to leave at least 1/8 space between the 2 sections of pages so they actually turn.
    • Keep in mind that you’ll the book will become twice it’s size or more once the ATC’s are loaded. I use photos corners to mount my ATC’s.
  • Art - Blog - Creativity

    Inspired by Summer

    As I sat down to create in the midst of a summer that I hadn’t planned, my mind wandered to the beautiful things. The things that make me appreciate summer. Beautiful colors. Flowers. Birds singing. Breeze blowing through open windows.
    All this had me in the mood for an explosion of color. I used my fingers to loosely apply paint in a tribute to a gorgeous sunrise or sunset. The colors were a little too bold. Too in your face so using a baby wipe I blended and softened the page until it made me happy.
    I pressed uninked rubber stamps into the paint to create some interest on the background as the stamps pulled even more of the still wet paint away with them as you can see above with the grid pattern.
    After heat setting the page I used a harlequin stamp with white ink to lightly stamp randomly around the background using white embossing powder over top to provide a little more kick to the white.
    Digging through my stash I found some rub-ons that fit my theme perfectly. The black really pops against the background.
    A canning jar full of flowers screams summer beauty to me, Casual, simple, perfect.
    I really wanted it to appear that these flowers were indeed inside a glass jar. This gave me a bit of a challenge.
    I stamped the jar twice. One was clear embossed for later use. The first was adhered directly to the page. I then stamped my bouquet of flowers onto tissue paper using black Staz-on ink. I adhered the tissue with matte medium and placed on the page, partially “inside” the jar.
    Next I cut out windows in the clear embossed jar. I cut a piece of vellum to fit and gave that a bit of shimmer with clear embossing as well. I carefully stacked and glued the pieces of the jar over the original stamped piece. Much to my great pleasure, the stems of the flowers shone through the “glass” as I had hoped.  I used a Tim Holtz word sticker to sum up my thoughts.
    The jar seemed to be missing something so I thought about the basket of goodies I carried home from a friends house like Little Red Riding Hood.
    The perfect embellishment was right there.
    I’m linking up today with Art Journal Journey for Inspired by… the theme chosen by this months host Gil from gibbyfrogettcraftations.
    Art Journal Journey